Here is our Music Video:


Below are the front panels of our digipak:

Below are the outside panels to our digipak.

Below are the outside panels to our digipak.

Below are the inside panels to our digipak.

Below are the inside panels to our digipak.

Click on the image below to access our website.

Friday 10 November 2017

R+P Post 33: Reflections on my role and contribution during Research and Planning

Throughout this process I believe all three of us have put it in a great contribution into the research and planning of our music video. With each of us playing to our strengths doing what we feel most comfortable

Helping designing the website
•I drew the first draft of the websites homepage

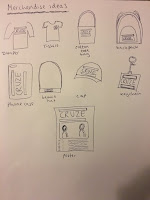
•I drew a list of the merchandise that we will be including in the "shop" section of the site
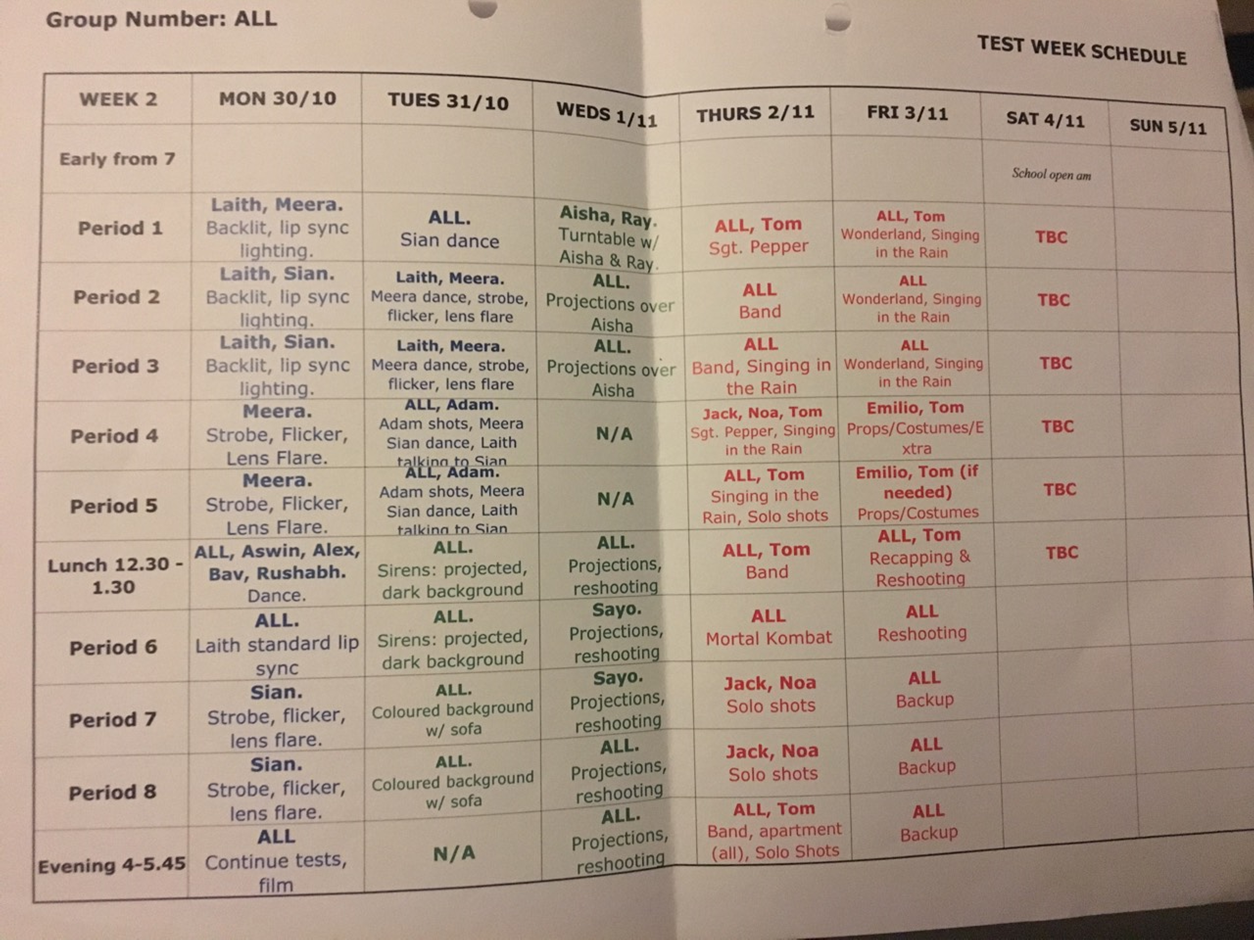
Preforming
•As I am the main performer, most of my time is spent completing this task
•I am the singer and so I had many solo shots of me lip syncing

Organizing the actors that we will be using
•Created a group chat on WhatsApp
•Collated pictures of everyone
•Made sure they knew what they needed to wear to fit the costume theme
•Made sure they all had the numbers of everyone in the group in case of emergency
•Made sure that they knew exactly what time to meet
Directing
•I helped to direct the shots of Ray where Sayo was cameraman
•I helped to direct the shots that I was in - giving directions for what I believed we should go for (especially in terms of framing)


Creating the makeup mood board
•This was a collection of images that we were going to use as inspiration for our actors

R+P Post 32: Test shoot and rough edit

The test shoot was a very important part of our planning as we were able to see which of our ideas worked and which didn't and that we needed to rethink. We wrote down the key shots and aimed to complete all of them during the sessions.

Below is the rough edit

Down below is the Test Shoot schedule that we followed; my group is written in the colour green for the week

One of the key things we needed to do in our test shoot was creating the different lighting set ups that we were going to use or were considering using. Having these lighting set ups saved is very useful because when we get to the actual shoot week we will not need to create new set ups, they will be there and ready for us to use making access both quick and easy
Here are four example stills of different lighting set ups


Another key thing we needed to do in our test shoot was to practice the handheld camera on Alex (Ray) whilst he was getting his solo shots while he was producing music. We wanted to test this to see if the handheld aspect created the authentic and natural vibe we had envisioned.
handheld still of DJ shot
Below is a video that showcases some behind the scenes videos that we took.


Overall the test shoot and rough edit were both very useful as it gave our group a true visual representation of our ideas compared to the previous Steal-O-Matic which we relied on. As well as this, it showed us the impracticalities of our initial ideas
Below are some issues we faced:

  • Handheld camera - the closer we got the more blurry the video got
  • Projections concept - a large and unwanted shadow was in the background - the image was flickering on the monitor and the camera
  • Coloured lighting - at times it was problematic as it meant that more lighting needed to be put on my face as the colour had drowned it out
We are in a very good position for our main shoot as we have had experience in the studio and dealt with varying challenges. From here on out we need to figure out how to deal with the issues by implementing changes

R+P Post 31: My Callsheet

A call sheet is a document which has health and safety information as well as the address of each location. This was all necessary to make sure the shoot ran smoothly

Below is an image of our call sheet


The call sheet also tells the reader when each person is expected to be on set - this is to reduce the level of confusion that might take place and to ensure that everyone knew when they were needed and that they would be punctual.

Overall this document was very useful as it made the shoot run smoothly without any issues, it also gave all the information needed to others who were involved in the test shoot like the director so he knew what was going on each hour. The call sheet therefore made the process nice and simple

R+P Post 30: My Shootboard


This document is our shoot-board for our test shoot. The shoot board aspect is seen in the fact that it has our activities clearly written down as well as when they all will be taking place.
MY GROUP IS IN GREEN (TUESDAY-WEDNSDAY)


During this we didn't have any actors and so we didn't need to notify them of anything or include them in any way into this document.
Overall this document was extremely useful for the test shoot, as it meant that we knew exactly when to complete the different tasks and who was coming in at what time. There was no place for confusion as a result. This therefore made the process smooth and simple.

R+P Post 29: Rehearsals

In order to ensure that our music video would work perfectly, we had to do rehearsals to help practice before the shoot week.

My lip sync by this point was good this, this is because of the lip sync practice I done during my Preliminary task. However, I still researched for some good tips regarding lip syncs on Youtube. Below is the video I watched.


We decided to focus more on the studio test shoot rehearsal and test out everything that we had planned. 

Through this rehearsal, I was able to...
1. I was able to test my performance skill once more before the actual shoot week.
2. We were able to practice what lighting looked the best
3. We were able to rehearse the different placements of the props beforehand
4. We also made sure that all costumes looked good under the intense light (as the light had a tendency to overpower props/people under it)

This was useful as it helped me practice and get into the correct mind set. It also allowed me to  work on my performance by helping me loosen up and get comfortable.

Below is a behind the scenes video of one of our rehearsal sessions.

R+P Post 28: My kit list

Below are two tables with the location kit list and the studio kit list (the studio kit list has some extra equipment)


The reason why the equipment in the Studio is different is because it is a lot more high tech giving us a more "professional" look for our music video. This is because the set ups can be changed manually through the use of props lighting and set design. One way that the studio shots look professional is through the use of the cyclorama which will help us to achieve an infinite background by ensuring that there are no gaps between the floor and the 'wall'. Another way is through the use of lighting which can create coloured spotlights.

R+P Post 27: Casting


Casting was very important for the performance aspect of the music video as well as the narrative aspect. When looking for actors we needed to consider people who would not only fit the criteria of the youth subculture we are trying to represent but also individuals who are reliable. We chose these individuals because they are already friends and are comfortable with each other and so the acting in that sense would be minimised

Name

Image

Kodie


Abigail


Sena


Budmi


Ayisha


Laith


Sadek


Arme


Anisa


Sayo


Jithmi


R+P Post 26: Set design, location and props


Below are some pictures from the location reccie, majority of our music video will be on location and so this was very important.

Use of the gate - I will be on the other side with the gate acting as a physical representation of a sort of barrier in the relationship This is something we referenced from 2NE1's music video lonely


This is one of our locations, which will be used for the narrative. There are two pathways, which both parties of the relationship will walk down representing a separation

Here is a wall with graffiti, which we will be using as a backdrop - many times
Here is the car park we are planning on using - this is most useful, as we needed a large space that still looked cool and urban, a car park was a perfect fit

In terms of set design in the studio we have a few key shots 
1. The projection shots
2. The sofa shots (group, couple, individual)
3. The shot with Ray DJ'ing (sound desk, table, laptop)
4. The shot with Ray and I (sound desk, laptop, table, stool)


In addition to this we do have a props list to help make our music video look more authentic and realistic 
1. Phone 
2. Headphones
3. Sofa 
4. Sound desk 
5. Table 
6. Laptop 
7. Stool